Hi you all! How's your weekend? I hope you had a fun weekend! Anyways, let's get on today's lesson!
What we have here is another seal. This time, a more wonderful looking seal compared to last week's tutorial. As usual, you can still apply this seal on websites typically for discount tags, or to presentations when you want to emphasize something, you put it on a seal.
But before we start, let's enumerate the things we want to achieve to get the seal that we want:
1) Polygonal circle
2) Gradient Inner color
3) Glossy Cover
4) Outline
5) Shadow
6) Good color combination and contrast
So open up your Photoshop or any other graphics editor you are comfortable with.

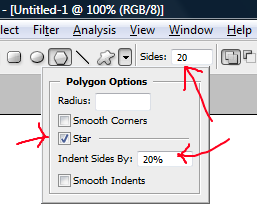
Now, conjure your 'Polygon Tool' as shown above.

Then set your 'Polygon Tool' option as 'Star' with Indent sides at 20%, and with 20 sides as shown above. That way, we should have a nice looking polygonal circle.
Start drawing your Polygon Circle on the canvas. And right click on it to turn it into 'New Selection'.

Now get the 'Gradient Tool' and choose some nice dark color. In this tutorial, I used violet.

Set your gradient option as shown above. Color to White, or in this case, Violet to white gradient to achieve a nice falloff effect on the Seal. Apply the gradient on your selection from bottom to top.

You should have now something like this. A polygonal circle with violet to white gradient.
Without losing your current selection, get the Ellipse Tool.

As shown above, get your 'Ellipse Tool' which shares the same sub menu as the 'Polygon Tool'.

As demonstrated, drag the ellipse just above the seal slightly to the left as shown above. Remember never to lose your previous selection while making the ellipse shape because we would want to intersect both selections.

After making the ellipse shape, right click on the ellipse shape and choose 'Make Selection' to get the dialog shown above. Since we would want to intersect the two selections to get the upper left region of the seal, choose 'Intersect with Selection' and hit OK.

We now have this new selection. Guess what we will be doing next! Apply the gloss effect!

Get the 'Gradient Tool' once again and this time, choose the Gradient Option of Color to Transparent so it is essential that you choose the color White from the color palette.

Apply the White to Transparent Gradient Tool to the intersected selection of the seal. Do it from top left to bottom right depending on the effect that you want to achieve. You should have something like the one shown above now. We're almost done making our website seal!

Right click on the layer where your website seal is situated. Choose 'Blending Options' and check the checkbox for 'Stroke' and set the settings as shown above. Since the base color of the website seal is violet, then we want a lighter version of that color to be its outer rim stroke so in this case, we chose Pink.
Also, add some 'Drop Shadow' by checking its checkbox.
And finally, just add some text. Make sure that your text color is light, in this case, it is white because we want to achieve a proper contrast that's nice to look at.
Now, we have the beautiful website seal!
Just a Note: It's always better to keep the number of characters you enter in the seal to a minimum. Just like the example, it's only 3 letters which is obviously an abbreviation of someone popular ^^. Anyway, your interface should be clean, that's the point.
I hope you learned much from this tutorial! Have a good day!