Tuesday, September 7, 2010
Saturday, September 4, 2010
Turbo C Programming Day 1b: Basic input, output and variables
Let's continue.


Clear Screen
Notice here, we add the new line clrscr();
This is important especially in Turbo C so that you'd get a clean output. What it does is simply clear the output screen before writing to it. This is especially useful when you had run a program previously, that outputs something to screen. And if you run your current program, your current output will not be concatenated on the previous content of the screen.

This is one such example. You have run the same program previously so the output screen has the values "Hello World". Now if you run the program again, if you don't clear the screen before writing to out, you'd get "Hello WorldHello World".
But if you perform clrscr() before writing to screen in this particular example, you'd get

So that's it for clrscr(). In other modern programming languages, this isn't needed as the output buffer is already automatically taken care of.
In this modified code listing, notice that we now have a variable declaration.
A variable is simply a placeholder for a value in a program. Each variable holds a value that persists throughout the whole lifespan of the program executing, that can be updated and extracted as needed.
Variables

In this example, we declare a variable and call it 'a', and it's datatype is 'int' or integer. We then understand that the variable 'a' must contain whole numbers and can also perform arithmetic with it.
Notice that we assign a value to it, 5, and that's without quotations because a value with single quotations ' ' is a character, while double quotations " " signifies a string.
On the printf command which is slightly different from the previous examples show that we would like to output a %d, or an integer, and this integer gets its value from 'a', the second parameter of printf.

Executing the above code will have the output as shown above.
Character variables

Suppose we change the data type of 'a' into 'char'. This time, this tells the compiler that 'a' is a character and it's values assigned to it are enclosed in ' '. In this example, we assign the character 'x' to variable 'a'.
We execute printf with %c, which tells the system that what is outputted is character type.

Here is the output.
String Variables

What if we want to store inside variables some words, or phrases or sentences? If our variable is of data type character, it will only hold 1 character! So how do we accomplish this? In modern programming languages, there is already a new data type called string, which stores values that contains more than 1 characters.
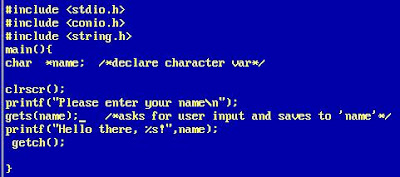
But in Turbo C, either we use a character array, or a pointer to a character variable. An indication that a variable is a pointer is the asterisk that precedes its variable name, as shown above, *name. We will have an in-depth discussion about pointers in the future articles but for now, let's focus on storing a string on a character data type.
Notice that we assign "sky" which is enclosed by double quotations to name. "sky" is a string.
And when we print out with printf, we use %s, for string.

The output of course is as shown above.
Keyboard Input into Variable

Take a look at the modified code above. There's a new command, gets(). What does it do?
It gets a value inputted into a keyboard by the user. And assigns that value to the parameter in gets. In this example, that value is placed in variable "name".
The code above is pretty self explanatory, the program asks for your name, you enter your name, and after entering, you hit the "Enter" key, then the program greets you!

Then you type your name,

After you type your name, hit 'Enter'.

That's it!
Variable input for calculation

Another example of the usefulness of a user input. The program code shown above simply asks for two values from the user, the first operand and the second operand, which it adds, and shows the result to the screen.
Notice that instead of gets, we use scanf with first parameter %d to tell it that we want to save to &a, and &b, an integer. Notice also the ampersand(&) beside variables a and b. This tells us that we want to write to the memory location of 'a' and 'b' instead, the values entered by the user.

Here's the sample output.
Feel free in trying out different uses of user input and calculations as well as screen display!
Stay tuned!
Friday, September 3, 2010
Turbo C Programming Day 1a: Basic input, output and variables
Hi all. So this will be the start of a series of tutorials as a crash course for Turbo C Programming.
As students probably know, Turbo C is one of the first programming languages taught at college.
It's interface looks primitive compared to modern IDEs such as Visual Studio, but still, Turbo C can be a powerful programming language, and a fundamental knowledge on computer programming in general begins here.

Assuming you already have Turbo C installed, let's continue. First, as shown in screenshot above, we need to set first the directories so the compiler knows where to find the files it needs.
Assuming you install your Turbo C in "C:\TC", so your directories settings should be same as above. Never forget this, as this is a common issue many newbies encounter.

Now let's begin coding. Shown above is a code listing for a very simple program for basic output, printing to screen the words "Hello World".
#include
main() <= like in every programming language, every program must have a "main()" routine or function, which is the starting or entry point of the program. Notice that every function must be enclosed in { and }.
printf("Hello World"); <= notice that every line of code, except for comments, within a function must be ended by semicolon(;).
The statement "printf" is an example of a method, a routine that accepts a parameter in between its parentheses and does an action about it. In this case, the parameter is "Hello World", and the action is printing it on screen.
getch(); <= is simply a method or command to tell the system to wait for user keyboard input before terminating. Without this, we wouldn't be able to see "Hello World" outputted to screen as the program is immediately terminated after printing in split second.

To actually make the program run, after saving(Shortcut F2), we must compile it first by choosing the option above.

After compilation, we run the program by choosing the menu option above.

And here is our first output, hooray! We are now able to print words, sentences, or even paragraphs onto a computer screen!
P.S: Printing "Hello World" to output stream is already a programming tradition when it is your first time trying out a programming language.
If you have questions, please feel free to ask, or leave a comment. Thanks! Stay tuned!
Sunday, July 4, 2010
How to Make a Nice Looking Web 2.0 Seal for Websites

Hi you all! How's your weekend? I hope you had a fun weekend! Anyways, let's get on today's lesson!
What we have here is another seal. This time, a more wonderful looking seal compared to last week's tutorial. As usual, you can still apply this seal on websites typically for discount tags, or to presentations when you want to emphasize something, you put it on a seal.
But before we start, let's enumerate the things we want to achieve to get the seal that we want:
1) Polygonal circle
2) Gradient Inner color
3) Glossy Cover
4) Outline
5) Shadow
6) Good color combination and contrast
So open up your Photoshop or any other graphics editor you are comfortable with.

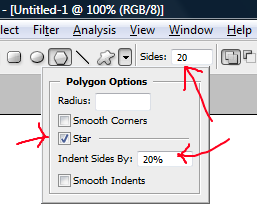
Now, conjure your 'Polygon Tool' as shown above.

Then set your 'Polygon Tool' option as 'Star' with Indent sides at 20%, and with 20 sides as shown above. That way, we should have a nice looking polygonal circle.
Start drawing your Polygon Circle on the canvas. And right click on it to turn it into 'New Selection'.

Now get the 'Gradient Tool' and choose some nice dark color. In this tutorial, I used violet.

Set your gradient option as shown above. Color to White, or in this case, Violet to white gradient to achieve a nice falloff effect on the Seal. Apply the gradient on your selection from bottom to top.

You should have now something like this. A polygonal circle with violet to white gradient.
Without losing your current selection, get the Ellipse Tool.

As shown above, get your 'Ellipse Tool' which shares the same sub menu as the 'Polygon Tool'.

As demonstrated, drag the ellipse just above the seal slightly to the left as shown above. Remember never to lose your previous selection while making the ellipse shape because we would want to intersect both selections.

After making the ellipse shape, right click on the ellipse shape and choose 'Make Selection' to get the dialog shown above. Since we would want to intersect the two selections to get the upper left region of the seal, choose 'Intersect with Selection' and hit OK.

We now have this new selection. Guess what we will be doing next! Apply the gloss effect!
Get the 'Gradient Tool' once again and this time, choose the Gradient Option of Color to Transparent so it is essential that you choose the color White from the color palette.

Apply the White to Transparent Gradient Tool to the intersected selection of the seal. Do it from top left to bottom right depending on the effect that you want to achieve. You should have something like the one shown above now. We're almost done making our website seal!

Right click on the layer where your website seal is situated. Choose 'Blending Options' and check the checkbox for 'Stroke' and set the settings as shown above. Since the base color of the website seal is violet, then we want a lighter version of that color to be its outer rim stroke so in this case, we chose Pink.
Also, add some 'Drop Shadow' by checking its checkbox.
And finally, just add some text. Make sure that your text color is light, in this case, it is white because we want to achieve a proper contrast that's nice to look at.
Now, we have the beautiful website seal!
Just a Note: It's always better to keep the number of characters you enter in the seal to a minimum. Just like the example, it's only 3 letters which is obviously an abbreviation of someone popular ^^. Anyway, your interface should be clean, that's the point.
I hope you learned much from this tutorial! Have a good day!
Friday, July 2, 2010
How to Make Icons for iPhone

Hi all! What we are going to do for today's Photoshop tutorial will be about making an icon, in this case, an iPhone icon! As you can see above, and Smart Phone icons in general, it has rounded corners, a glossy effect, and some simple graphic inside. So fire up your Photoshop now so we'll get started!
By the way, before we even begin, download some suitable custom brushes that you can use for your icon. You can download a great deal of cool brushes at Deviant Art.

Just like in previous tutorials, we will use the 'Rounded Rectangle' tool so we will have a rounded corner rectangle that looks modern.

Then, choose the color that you want and then choose the 'Gradient' tool with the settings shown above. In this case, I chose Orange color and a Color to White gradient. After doing so, start dragging a shape into your canvass. It doesn't have to be big since iPhone icons are not big but be sure that the resolution or DPI is high enough for details.
In your shape, apply the gradient vertically in such a way that the lighter part is at the bottom as shown below.

After your creation of shape and application of gradient, you should have a graphic the same as shown above.
What we'll need to do next is add the glossy effects, background pattern, and the logo itself inside the icon.

Now get your 'Brush Tool' using the brush that you would want to appear in the background. This is where we can use the custom brush we downloaded from Deviant Art. In my case, I used a Rising Sun pattern for my background.
NOTE: Make sure to choose 'Overlay' for the blending mode of your brush when applying the icon background.

The option for setting the blending mode can be found just below the menu bar of Photoshop. Make sure it's set to Overlay before applying the brush. Just choose a darker color for this.

Don't remove the rounded rectangle selection yet as we will need to have an intersection of selections for the glossy part of the icon. Get the 'Ellipse Tool' and make a selection as shown above. The intersection of both selections will be our glossy part. Now, Right click on the new selection and choose 'Intersect'.

As shown above, we choose the intersect option of making the new selection.
Get your gradient tool again but this time, choose 'White' as the color and Color to Transparent option for the gradient option as shown above. This is because we would like to achieve a fall off or fading effect to the glossy top of the icon.
Final step would be to create the actual graphic or logo inside the icon that you've recently created. In my case, I used 'Paths' to have clean drawing. By setting some blending options, you would be able to create amazing effects such as adding Drop Shadows.
After everything is complete, you can save it as Gif, or Png, or Ico for icons.
So, that's it! I hope you had fun following this tutorial!
How to Make a Seal for Websites 1

What we are going to do in today's Photoshop tutorial on web elements is about how to make a seal such as the one shown above, which can also be applied to discount seals or tags when you are trying to sell something on your site.
Now open up your Photoshop or any related graphics editing software!
Make a new document or canvas with dimensions of around 4 x 4 inches.
Make a new layer for the outer rim of the seal.

Click and hold to the 'Round Tool' as shown above to show its sub-tools inside.

Now to achieve the star-like effect of the seal, we need to increase the sides of the Polygon by setting the option as shown above. Set the sides to '20', check the Checkbox labelled 'Star' and indent sides by '20%'. You can actually play with the settings and see what's best for your creation.

Now, click and drag the tool across your canvass to achieve the desired shape. Play with its Blending Options a bit such as its bevel, pattern, gradient, etc. Now to further enhance your Web Element Seal, get a new circle selection and make an inner selection on the inside of the newly created polygon. Make sure it is on a new layer or else you'll mess up your shape.

Fill your selection with a dark color and after that, make a further inner selection and this time, fill it with a contrasting color with the one on its outer rim. In this case, the inner selection was filled with color white.

Now, next step would be to get the 'Circle Tool' again to make a rounded selection as shown above. We will use this path as a placeholder for the text of your Web Element Seal. After getting the shape right, get the 'Text Tool' and position the cursor over the shape so that Photoshop will know that we want to write on that path. Click the path and begin typing. Set the fonts and colors and you'll have something like the one shown below.
Add some more text and your seal is done! There are many different kinds of seals and this is just one of them. Watch out for more kinds of seals only at Html Css Photoshop Tutorials.
Subscribe to:
Posts (Atom)